Create and Format a Table
doc.AddTable() returns an empty table, AddRow() appends a row to it, and
AddCell() appends a cell to that row. Nothing declares a column count in
advance, so the table is exactly as regular as the rows you build. A cell holds
paragraphs rather than text, which is why writing one string is a chain of four
calls.
table := doc.AddTable()
table.Properties().SetWidthPercent(100)
table.Properties().Borders().SetAll(wml.ST_BorderSingle, color.Auto, 2*measurement.Point)

row := table.AddRow()
row.AddCell().AddParagraph().AddRun().AddText("Name")
row.AddCell().AddParagraph().AddRun().AddText("John Smith")

row = table.AddRow()
row.AddCell().AddParagraph().AddRun().AddText("Street Address")
row.AddCell().AddParagraph().AddRun().AddText("111 Country Road")
Formatting is split across three property types and they are not
interchangeable. table.Properties() covers width, alignment, layout, borders
and the style name. row.Properties() covers height and page-break behavior.
cell.Properties() covers cell width, shading, spans, vertical alignment,
borders and margins. Anything about the text itself belongs to the paragraph or
the run inside the cell.
Two tables added one after another merge into a single table when Word opens the
file. Insert a doc.AddParagraph() between them, which is what the example does
between every table it builds.
Setting widths
Both tables and cells accept an absolute width, a percentage, or automatic sizing.
| Call | Argument | What it means |
|---|---|---|
SetWidth(d) | a measurement.Distance | Fixed width, stored in twentieths of a point. |
SetWidthPercent(pct) | a percentage, 0 to 100 | Share of the available width. |
SetWidthAuto() | none | The layout engine decides. |
The three are alternatives, not a stack. All of them write the same underlying
width element, so calling SetWidth and then SetWidthPercent on the same
table or cell leaves only the percentage; there is no error and no merge, the
last call simply replaces the first.
Units matter more than they look. measurement.Inch, measurement.Point,
measurement.Millimeter and the rest are Distance values that compose by
multiplication, so 4*measurement.Inch is the idiom and a bare 4 means four
points. Passing the wrong unit produces a wrong-sized table, not an error. There
is no plain measurement.Pixel; pixels are resolution-specific, so the package
offers Pixel72 and Pixel96.
Cell widths are preferences. Under the default autofit layout Word is free to
override them to fit the content, which is visible in the sample output: the
table whose cells ask for 0.25 inch and 2.5 inch still stretches across the 90
percent width set on the table. table.Properties().SetLayout(wml.ST_TblLayoutTypeFixed)
corresponds to clearing “Automatically resize to fit contents” in Word and is
what makes declared widths binding. Passing wml.ST_TblLayoutTypeAutofit or the
unset value removes the layout element rather than setting autofit explicitly.
Borders and shading
table.Properties().Borders() exposes the six table edges: top, bottom, left,
right, and the interior horizontal and vertical lines. SetAll sets all six to
the same type, color and thickness. Individual setters exist for each, and
cell.Properties().Borders() offers the same six for one cell.
Thickness is converted to eighths of a point and clamped to the range the format
allows, from 0.25 point to 12 points. A non-positive thickness is a special
case: the size attribute is left off entirely and the viewer applies its own
default, which is why the example’s measurement.Zero produces a thin line
rather than no line at all.
Shading is a cell property and takes three arguments:
cell.Properties().SetShading(wml.ST_ShdSolid, color.LightGray, color.Auto)
cell.Properties().SetShading(wml.ST_ShdThinDiagStripe, color.Red, color.LightGray)
The first argument is the pattern, the second is the pattern’s foreground color
and the third is the fill behind it. With wml.ST_ShdSolid the foreground
covers the cell completely and the fill argument has no visible effect, so the
color you want is the second one. With a striped or percentage pattern such as
wml.ST_ShdThinDiagStripe or wml.ST_ShdPct20, both colors show. Passing
wml.ST_ShdUnset removes the shading. Banding a table by hand means calling
SetShading on the cells of alternating rows, which is what the example’s third
table does before the last one shows the same effect through a style.
Spanning columns and merging rows
Horizontal and vertical merges use different mechanisms.
SetColumnSpan(n) on a cell’s properties makes it occupy n grid columns. The
cell is still one cell, so you add one cell for the span rather than adding
several and merging them. SetColumnSpan(0) clears the span.
Vertical merges are declared per cell across consecutive rows. The top cell of
the merge takes SetVerticalMerge(wml.ST_MergeRestart) and every cell below it
in the same column takes wml.ST_MergeContinue. Each row still needs its full
set of cells, including the continuation cells.
row := table.AddRow()
cell := row.AddCell()
cell.Properties().SetVerticalMerge(wml.ST_MergeRestart)
cell.AddParagraph().AddRun().AddText("Vertical Merge")
row.AddCell().AddParagraph().AddRun().AddText("")

row = table.AddRow()
cell = row.AddCell()
cell.Properties().SetVerticalMerge(wml.ST_MergeContinue)
cell.AddParagraph().AddRun().AddText("Vertical Merge 2")
row.AddCell().AddParagraph().AddRun().AddText("")
Only the text in the restart cell is rendered. The example writes “Vertical Merge 2” into the continuation cell and it never appears in the output, because a continuation cell contributes its space to the merge and nothing else. If text seems to have vanished from a merged cell, this is why.
Row height and cell alignment
row.Properties().SetHeight(h, rule) takes a distance and a rule.
wml.ST_HeightRuleExact fixes the height and clips content that does not fit,
wml.ST_HeightRuleAtLeast treats it as a minimum, and wml.ST_HeightRuleAuto
sizes to the content. Passing wml.ST_HeightRuleUnset clears the row
properties.
Vertical alignment within a cell is separate from the paragraph’s horizontal alignment, and centering text in a tall cell needs both:
row.Properties().SetHeight(2*measurement.Inch, wml.ST_HeightRuleExact)
cell := row.AddCell()
cell.Properties().SetVerticalAlignment(wml.ST_VerticalJcCenter)
para := cell.AddParagraph()
para.Properties().SetAlignment(wml.ST_JcCenter)
para.AddRun().AddText("hello world")SetHeight, SetCantSplit and SetTblHeader each replace the whole row
property list rather than adding to it, so only the last one called survives.
Setting a row height and then marking the row unsplittable loses the height.
Applying a table style
A style keeps formatting out of the loop that fills the cells and gives you
banding without touching individual cells. Build it on doc.Styles, then name it
on the table:
ts := doc.Styles.AddStyle("MyTableStyle", wml.ST_StyleTypeTable, false)
ts.TableProperties().SetRowBandSize(1)
ts.TableConditionalFormatting(wml.ST_TblStyleOverrideTypeBand1Horz).
    CellProperties().SetShading(wml.ST_ShdSolid, color.LightBlue, color.Red)
ts.TableConditionalFormatting(wml.ST_TblStyleOverrideTypeFirstRow).
    RunProperties().SetBold(true)

table.Properties().SetStyle("MyTableStyle")
look := table.Properties().TableLook()
look.SetFirstRow(true)
look.SetHorizontalBanding(true)
TableConditionalFormatting returns the same object for a given override type
every time it is called, so you can build one part of the style up in several
statements. The types cover the first and last row, the first and last column,
the four corner cells, the whole table, and the two horizontal and two vertical
bands.
Defining conditional formatting is not enough on its own. The style says what a
first row or a band looks like; the table’s TableLook says which of those
parts are switched on for this particular table. A style with banding that
renders flat almost always means SetHorizontalBanding(true) was never called
on the table. SetRowBandSize and SetColumnBandSize control how many rows or
columns each band covers.
AddStyle returns the existing style if the ID is already in use rather than
creating a duplicate, so a helper that builds a style is safe to call more than
once.
Inserting a table into existing content
doc.AddTable() appends to the end of the body. To place a table somewhere
specific, anchor it to a paragraph with doc.InsertTableBefore(p) or
doc.InsertTableAfter(p). Both search the whole body, including inside table
cells, so they work for nesting as well as for top-level placement.
The anchor has to be a paragraph that is actually in the document. When it is
not found, both calls fall back to AddTable() and the table lands at the end of
the body instead of returning an error.
Limitations
Word will not open a document whose table row has no cells, or whose cell does
not end with a paragraph. doc.Validate() catches both before you write the
file and reports “table row must contain a cell” or “table cell must end with a
paragraph”. Adding a nested table with Cell.AddTable() appends the trailing
paragraph for you.
Grid columns are filled in automatically during save, which is what keeps
SetColumnSpan from corrupting the file. Table.EnsureGridColumns() is exposed
if you need it earlier, but it only populates a grid that is still empty and
does nothing on a table that already has one.
Run the example
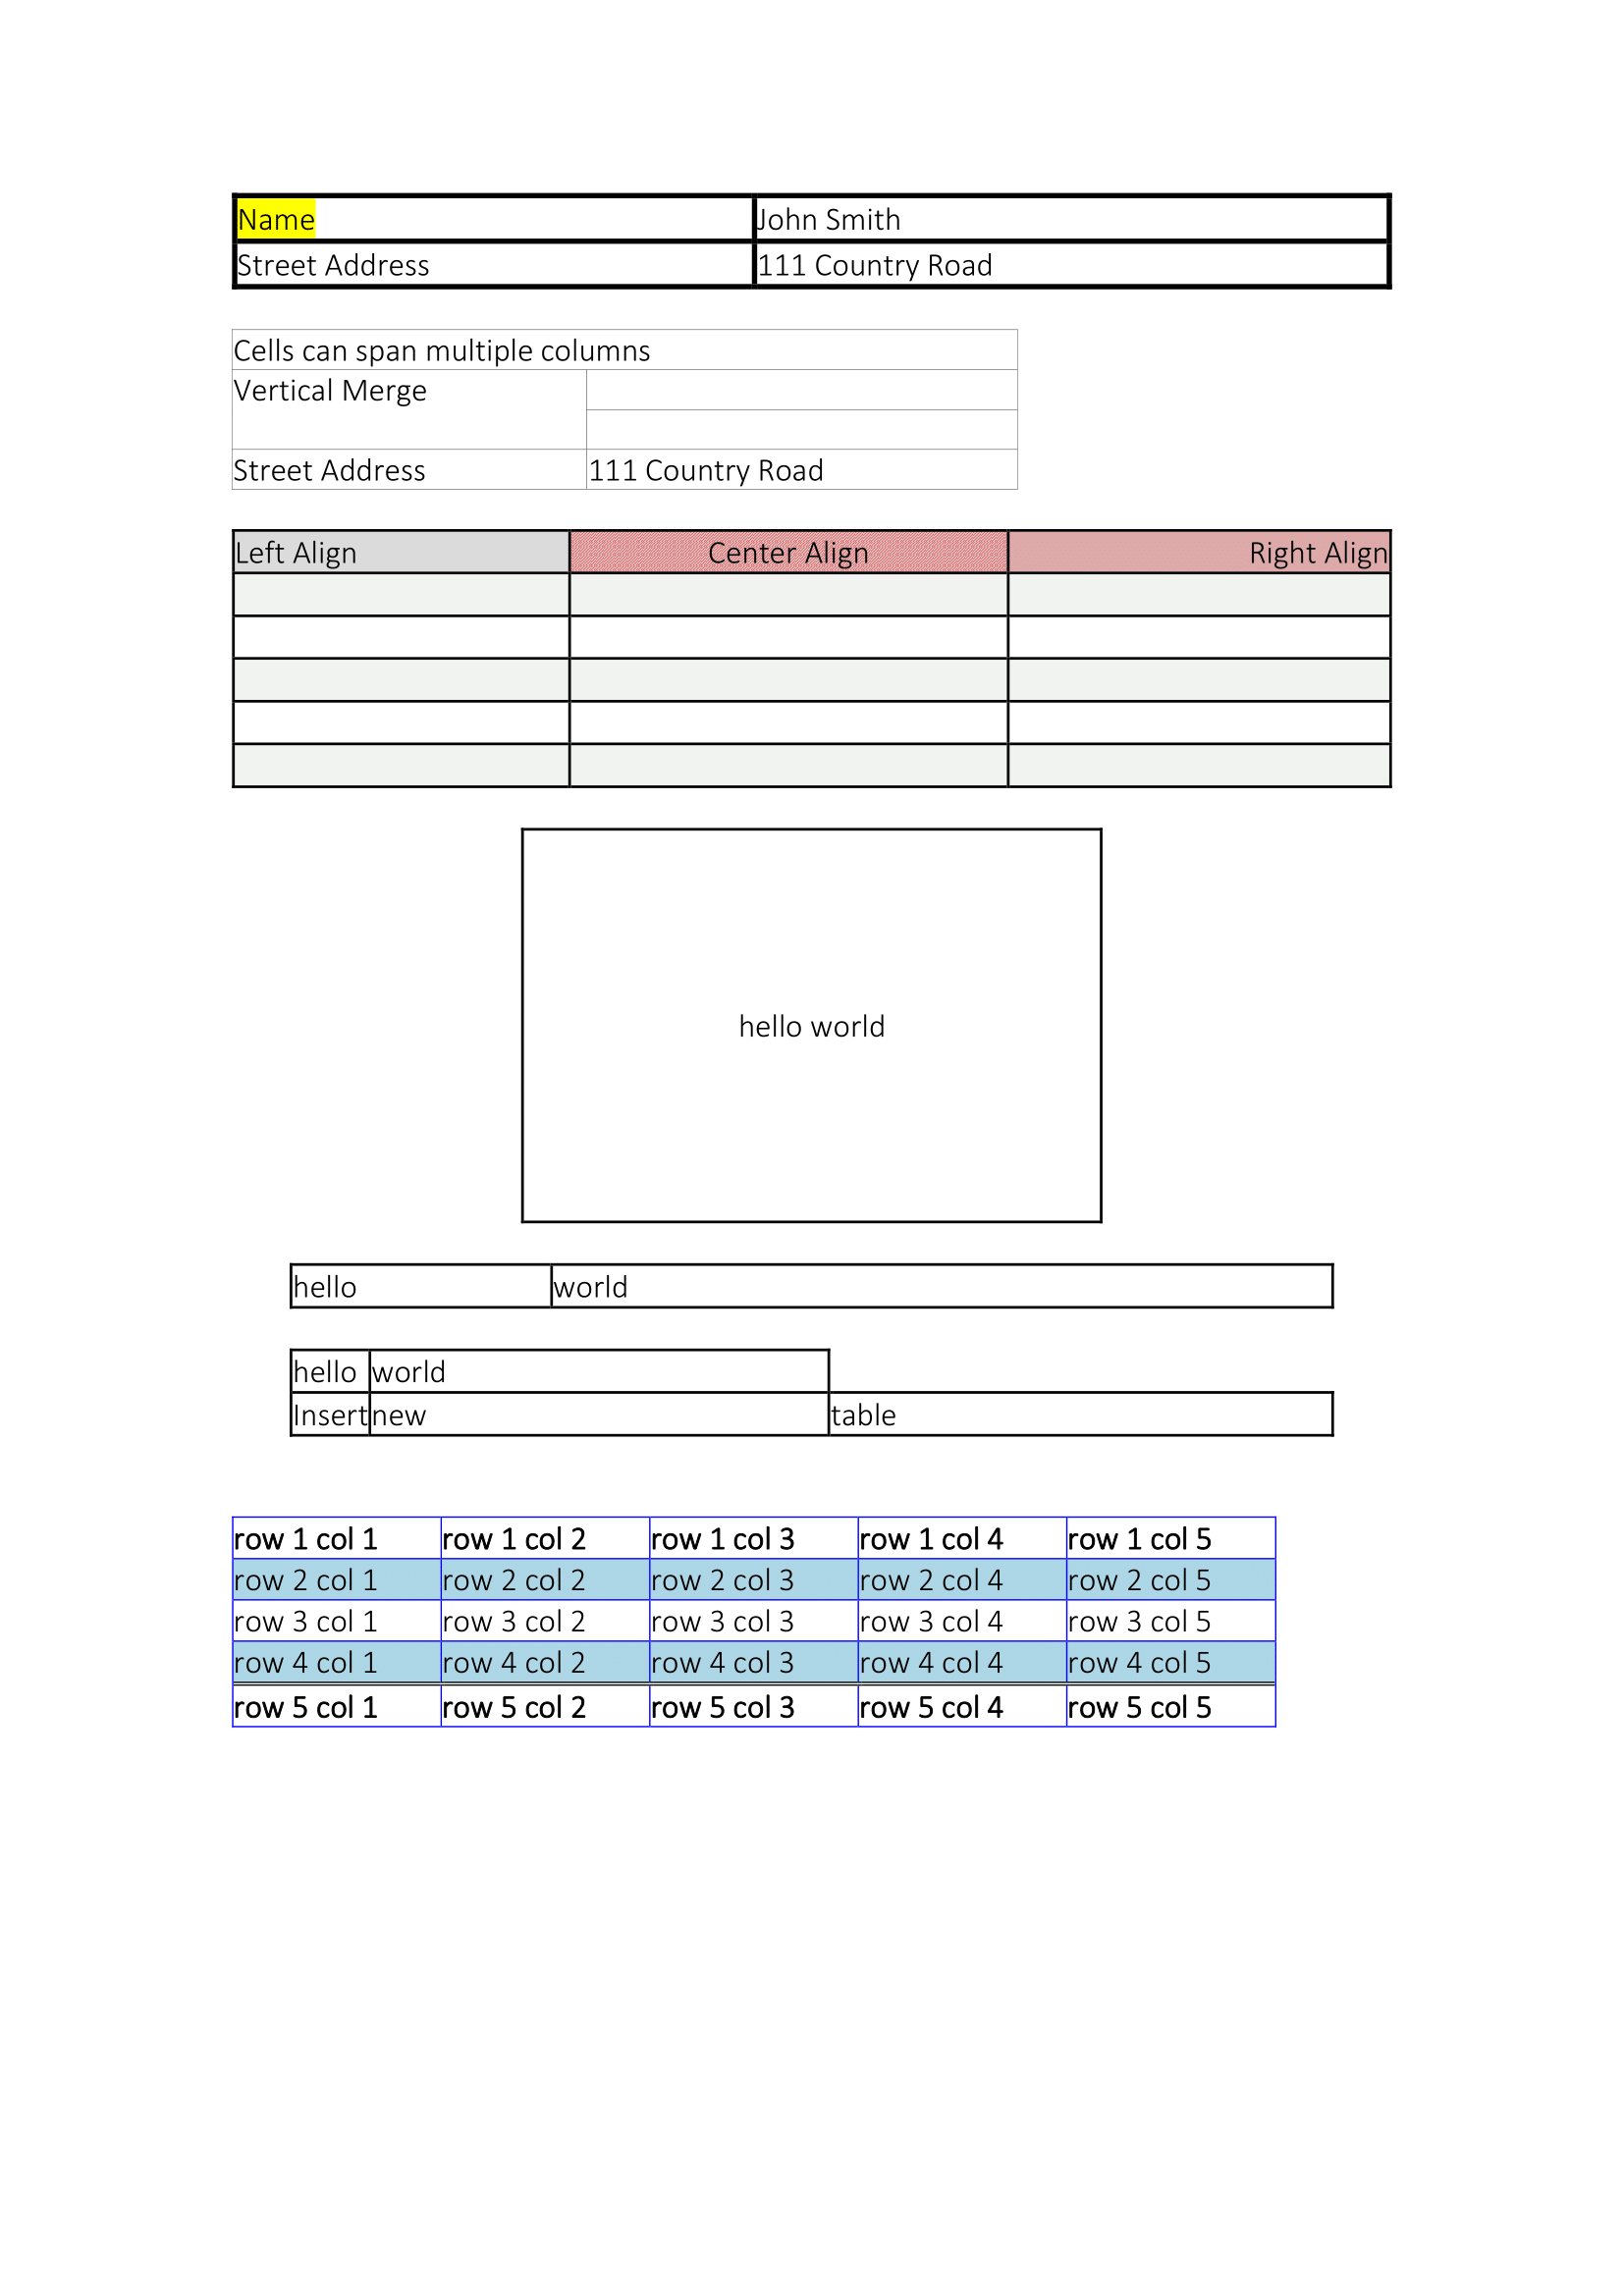
The example builds seven tables in one document, one per feature: percentage and absolute widths, thick and thin borders, hand-rolled row banding, an exact row height with centered content, cell-level widths, a table inserted before an existing paragraph, and a custom style with automatic banding.
git clone https://github.com/unidoc/unioffice-examples.git
cd unioffice-examples/document/tables
go run main.go
If this is your first time using UniOffice, follow the getting started guide to create an API key and set up your development environment.
View the full source
Sample output