HTML Formatting
AddHTML takes a string of markup and turns it into formatted runs, so a
sentence with three formatting changes in it becomes one call instead of six.
It is the natural fit when the formatting arrives as data, from a CMS field or a
user-supplied snippet, rather than being decided in your code.
It is not an HTML renderer. Seven inline tags are recognized, everything else is ignored, and the parser is a strict XML decoder. For converting real HTML pages into documents, use UniHTML.
Paragraph.AddHTML against Run.AddHTML
Both exist and they behave differently. The choice matters more than the tag list.
| Call | What it does |
|---|---|
para.AddHTML(s) | Creates a run per formatting change, so different spans of s can carry different formatting. |
run.AddHTML(s) | Appends the text content of s to the run and applies every tag it finds to the whole run. |
Run.AddHTML therefore cannot produce mixed formatting, and it also restyles
text the run already had. In the example, a run gets AddText with a literal
"<i>italic</i>" in it followed by AddHTML("<i>italic</i>"), and the entire
run, literal text included, comes out italic. Reach for the paragraph method
unless you specifically want one uniformly formatted run.
Supported tags
| Tag | Effect |
|---|---|
<b>, <strong> | Bold |
<i>, <em> | Italic |
<u> | Single underline |
<strike> | Strikethrough |
<mark> | Highlight, yellow by default |
<sub> | Subscript |
<sup> | Superscript |
<u> and <mark> both read a color attribute, which the godoc does not
mention. <u color="red"> sets the underline color from the name table in the
color package; <mark color="green"> picks from the sixteen Word highlight
names (black, blue, cyan, green, magenta, red, yellow, white,
darkBlue, darkCyan, darkGreen, darkMagenta, darkRed, darkYellow,
lightGray, darkGray). An unrecognized name is not an error: underline falls
back to black and highlight to yellow.
Doing it
para := doc.AddParagraph()
para.AddHTML(`<b>This is a <em>sample</em> of <i>HTML text</i></b> and this one is <u>underlined</u>`)

// A single run, uniformly formatted.
run := doc.AddParagraph().AddRun()
run.AddHTML(`<mark color="green">highlighted</mark>`)
Tags nest, and the innermost run picks up every enclosing tag, so
<u><b><i>x</i> y</b> z</u> gives three runs with underline on all of them,
bold on the first two and italic on the first.
Limitations
The string is parsed with Go’s XML decoder in strict mode, and the loop stops at the first parse error without reporting it. Three consequences follow.
A bare & or < in the text discards the entire call. AddHTML("Tom & Jerry <b>bold</b>") adds no runs at all, silently. Escape them as & and <
and the same string works.
A mismatched or unclosed tag truncates from the error onward and leaves partial
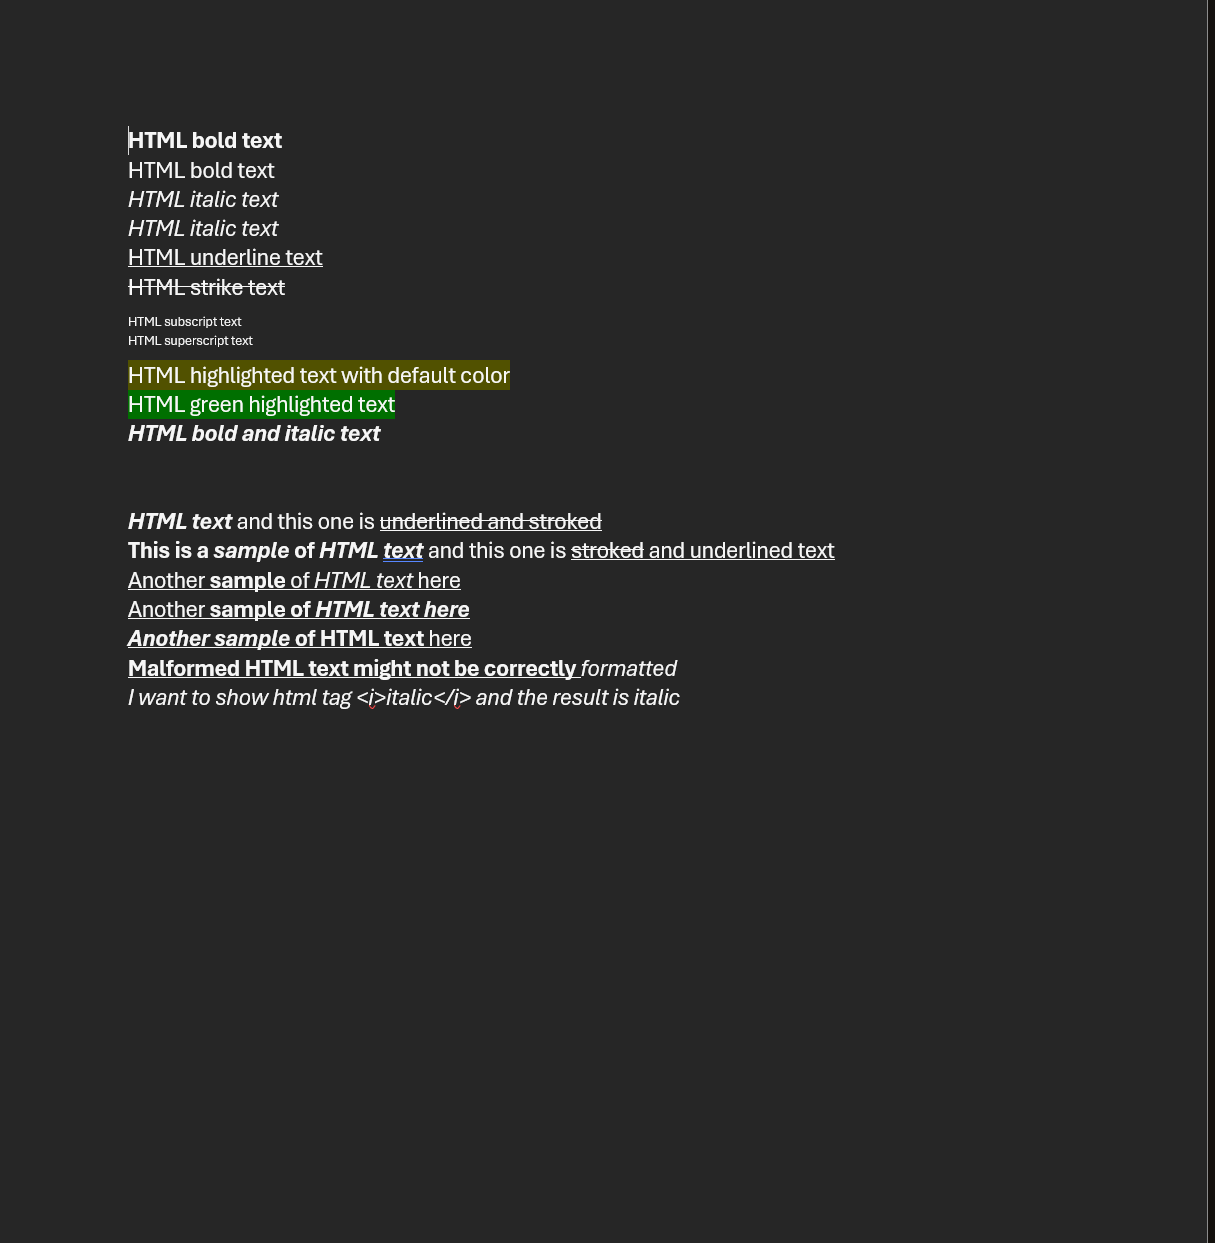
formatting behind. The example’s <u><b>Malformed HTML text might not be correctly <i>formatted</i></u> renders with the last word carrying only italic,
because the </u> that closes a <b> ends parsing. The example’s
<strong>HTML bold text</stong> line has a typo in the closing tag, so that
line is not bold in the sample output at all.
Void tags need closing. <br> does not insert a line break; the decoder treats
it as an unclosed element, the text after it lands in a separate run, and the
break is lost. Use run.AddBreak() for a line break.
Paragraph.AddHTML panics on unsupported tags that nest around several children,
for example <div><span>a</span><span>b</span></div>. The copy path
dereferences run properties that no supported tag ever created. Strip tags you
do not need before passing the string in.
Run the example
The example writes one paragraph per tag using a createParaRunHTML helper that
goes through Run.AddHTML, then switches to Paragraph.AddHTML for the nested
and mixed cases lower down. The difference between the two halves of the file is
the difference between the two methods.
git clone https://github.com/unidoc/unioffice-examples.git
cd unioffice-examples/document/text-formatting-tag
go run main.go
If this is your first time using UniOffice, follow the getting started guide to create an API key and set up your development environment.
View the full source
Sample output