File Attachment
A file attachment annotation embeds a file in the document and pins it to a spot on a page, where the viewer shows it as a small icon: a paperclip or a push pin. Use it when the attachment belongs to a particular place in the document, a spreadsheet backing one table or the source data for one figure, rather than to the document as a whole.
Two objects are involved. model.EmbeddedFile holds the bytes and the file’s metadata,
and annotator.FileAnnotationDef describes where the icon goes and what it looks like.
CreateFileAttachmentAnnotation combines them into a /FileAttachment annotation whose
FS entry is the file specification carrying the embedded stream.
Doing it
emFile, err := model.NewEmbeddedFile(attachmentPath)
if err != nil {
    return err
}
emFile.Description = "Sample Attachment"
emFile.Relationship = model.RelationshipData

fileAnnotDef := annotator.FileAnnotationDef{
    X:            box.Urx - 20,
    Y:            box.Ury - 20,
    Width:        10,
    Height:       15,
    Color:        model.NewPdfColorDeviceRGB(1.0, 0, 0),
    EmbeddedFile: emFile,
    Description:  emFile.Description,
    IconName:     "Paperclip",
}

fileAnnot, err := annotator.CreateFileAttachmentAnnotation(fileAnnotDef)
if err != nil {
    return err
}

page.AddAnnotation(fileAnnot)
NewEmbeddedFile reads the file from disk and fills in Name from the base name of the
path. Override Name if the attachment should be presented under a different filename;
that string is what the viewer offers when the user saves it.
NewEmbeddedFileFromContent does the same from a byte slice, naming it attachment.
Positioning against the page’s media box, as above, is the usual way to pin the icon to a
corner. page.GetMediaBox() gives you Llx, Lly, Urx and Ury to work from, which
avoids assuming a page size.
IconName chooses which predefined icon the viewer draws. The names conforming readers are
expected to support are Graph, PushPin, Paperclip and Tag, and PushPin is the
default when the field is empty. Other names are allowed but not guaranteed to render.
Several fields fill themselves in. A nil Color becomes black, an empty Description
falls back to the embedded file’s Name, and a nil CreationDate becomes the current
time, written to both CreationDate and M. Description becomes the annotation’s
Contents, which is the text a viewer shows as the comment attached to the icon, separate
from the Description you set on the EmbeddedFile itself, which goes into the file
specification’s Desc.
Limitations
No appearance stream is generated. Unlike the shape annotations in annotator, this
function writes annotation data only and leaves the icon to the viewer, so the icon’s
artwork, and how closely it respects Width and Height, is viewer-specific. The sample
output below is Adobe Reader.
The file goes into the annotation and nowhere else. It does not land in the document’s
EmbeddedFiles name tree, which means PdfReader.GetAttachedFiles will not return it and
viewers that build their attachment list from that tree may not list it. If the file should
appear in the document-level attachment list, attach it there as well with
PdfWriter.AttachFile, covered in the attachments guides.
EmbeddedFile.FileType, which NewEmbeddedFile populates by sniffing the content, is not
written to the PDF. The embedded file stream’s /Subtype is always text/plain
regardless, so setting FileType yourself changes nothing in the output.
EmbeddedFile is required and unchecked. A nil EmbeddedFile in the definition panics
rather than returning an error. The only error the function returns comes from converting
CreationDate into a PDF date.
Run the example
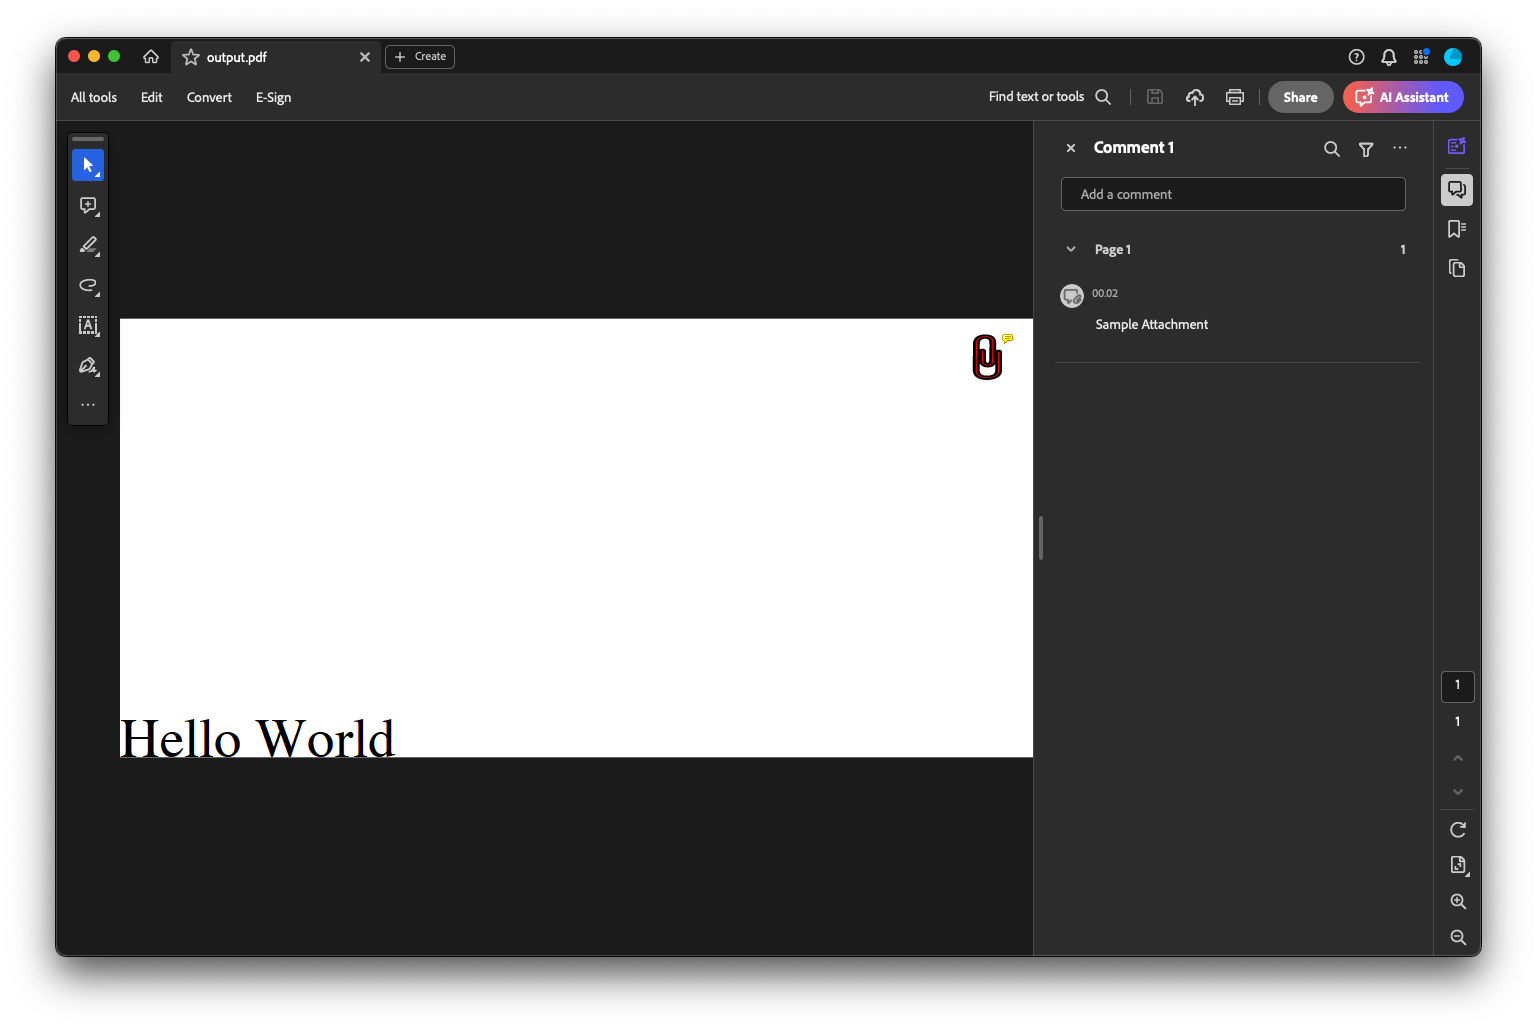
The example attaches a file to the first page of the input, at the top right corner of the
media box, with a red paperclip icon. annotatePdfAddFile does all of it and writes the
result with pdfReader.ToWriter(nil), which copies everything else in the document
unchanged.
git clone https://github.com/unidoc/unipdf-examples.git
cd unipdf-examples/annotations
go run pdf_annotate_add_file.go ../attachment/minimal.pdf output.pdf ../attachment/dummy.xml
If this is your first time using UniPDF, follow the getting started guide to create an API key and set up your development environment.
View the full source
Sample output
The input document:

After the run, opened in Adobe Reader, with the paperclip icon in the corner and the description shown as a comment: