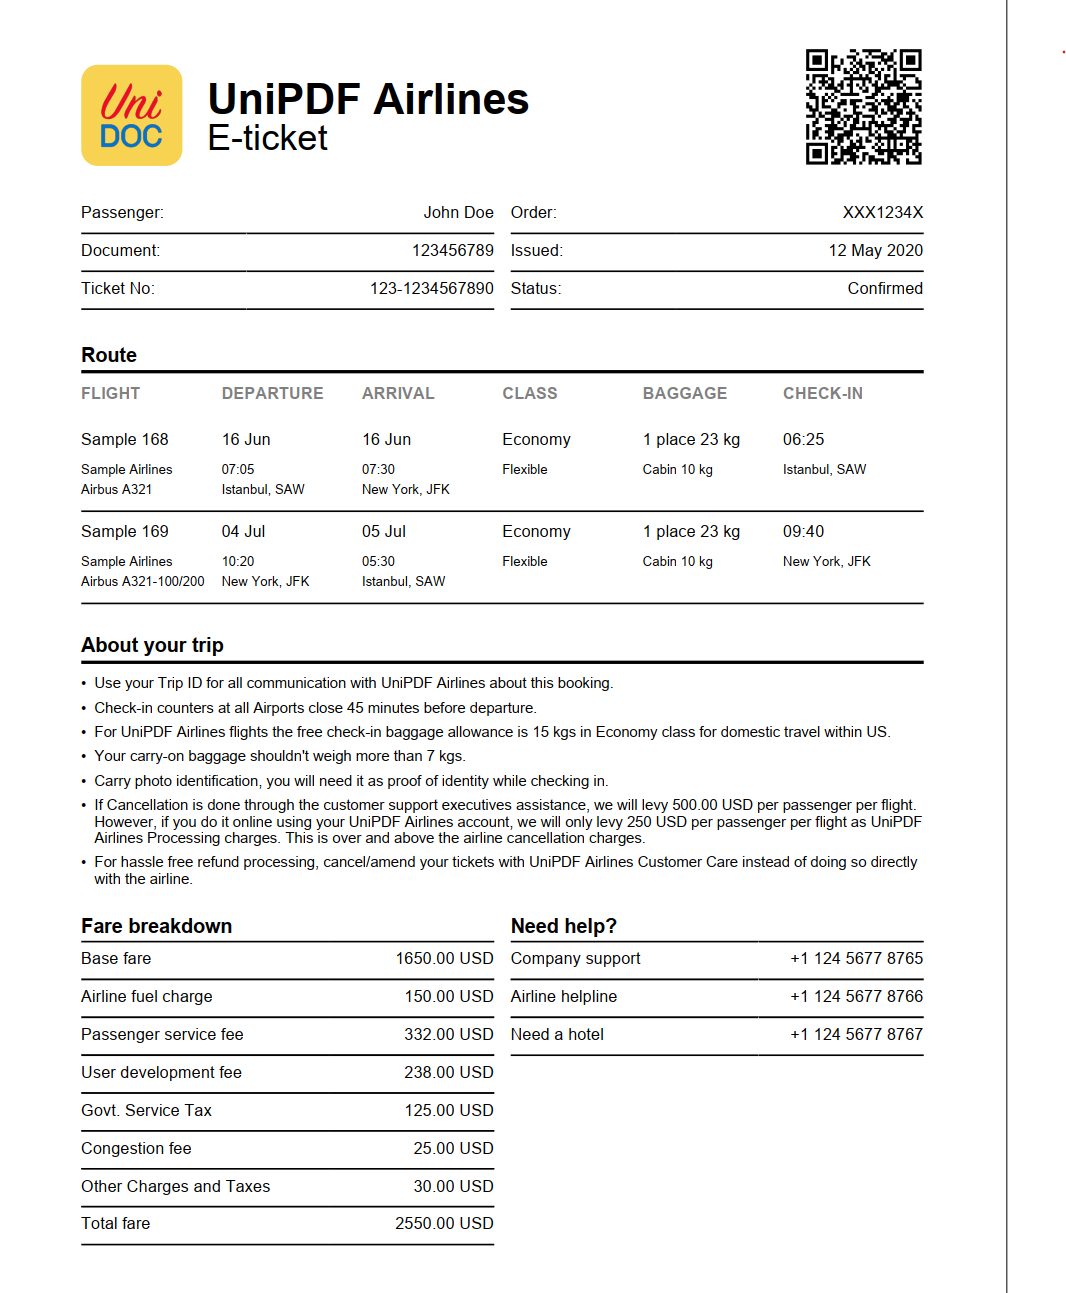
Airplane Ticket
A single-page e-ticket: passenger and order details in two side-by-side tables, a six-column route table, a fare breakdown, and a QR code linking back to the example. It is the clearest illustration of the property-map style, where one dictionary of attribute values is passed to a shared subtemplate and adjusted per call. The templates overview covers the mechanics common to every template here.
One dictionary, many cells
Almost every cell on the page goes through table-cell-paragraph, which takes its
attributes from the dictionary it is handed:
{{define "table-cell-paragraph"}}
    <table-cell colspan="{{.Colspan}}" align="{{.Align}}" border-width-top="{{.BorderTopSize}}" indent="{{.Indent}}">
        {{template "simple-paragraph" .}}
    </table-cell>
{{end}}
The caller builds a full set of values once with dict, then varies two or three keys
per cell with extendDict:
{{$props := dict "Colspan" 1 "Align" "left" "BorderTopSize" 0 "Indent" 0 "Margin" "3 0 5 0" "Font" "helvetica" "FontSize" 10 "TextColor" "#000000"}}
{{template "table-cell-paragraph" (extendDict $props "Align" "left" "Text" "Passenger:")}}
{{template "table-cell-paragraph" (extendDict $props "Align" "right" "Text" .ticket.Passenger)}}
extendDict writes into the map it is given rather than copying it, so every key set
on one call stays set for the calls after it. That is convenient when a run of cells
shares a style, and it is why the route table restates BorderTopSize and
BorderBottomSize on calls where the value has not changed - omitting one would
inherit the previous cell’s border rather than fall back to the default. The same
behavior makes a deliberate mid-loop change concise:
{{$props = (extendDict $props "Margin" "5 0 0 0" "FontSize" 8)}}Every following cell in that iteration is 8 point, until the next iteration rebuilds
$props with dict.
The subtemplate has no defaults of its own, so the dictionary must carry every key it
reads; a missing one renders as the literal text <no value> inside the attribute. The
bank account statement uses the opposite arrangement,
where the subtemplate defaults each attribute and callers pass only what differs.
The QR code
The QR image is produced in Go with boombuler/barcode,
converted to a *model.Image, and registered under a name the markup then uses:
qrCode, err := createQRCode("https://github.com/unidoc/unipdf-examples/tree/master/templates/airplane-ticket", 500, 500)
if err != nil {
    log.Fatal(err)
}

tplOpts := &creator.TemplateOptions{
    ImageMap: map[string]*model.Image{
        "qr-code-1": qrCode,
    },
}<image src="qr-code-1" fit-mode="fill-width" margin="5 0 0 30"></image>createQRCode encodes at error correction level M with automatic version selection,
scales the barcode to the requested pixel size, then wraps it with
model.ImageHandling.NewImageFromGoImage. The 500 by 500 is the raster size, not the
size on the page - fit-mode="fill-width" scales the image to its cell.
An src that is neither an ImageMap key nor a path() expression makes
DrawTemplate return an error, unlike a bad color or font name, which falls back to a
default without complaining.
Formatting dates
The JSON carries timestamps as 2006-01-02T15:04:05 strings and the template needs
several presentations of them, so parsing and formatting is exposed as a helper:
HelperFuncMap: template.FuncMap{
    "formatTime": func(val, format string) string {
        t, _ := time.Parse("2006-01-02T15:04:05", val)
        return t.Format(format)
    },
},
{{template "table-cell-paragraph" (extendDict $props "Text" (formatTime $route.Departure "02 Jan"))}}The parse error is discarded, so a value that does not match the layout formats the zero time instead of failing the draw. Fine for a sample, worth tightening for real data.
Run the example
The layout is a single main.tpl with no header or footer, the ticket being one page.
main reads the template and the JSON, builds the QR code, and makes one
DrawTemplate call.
git clone https://github.com/unidoc/unipdf-examples.git
cd unipdf-examples/templates/airplane-ticket
go run pdf_airplane_ticket.go
If this is your first time using UniPDF, follow the getting started guide to create an API key and set up your development environment.
View the full source
Sample output